
When I was a kid, we had family reunions every other year. I got to see, meet, and play with cousins I didn't even know I had.
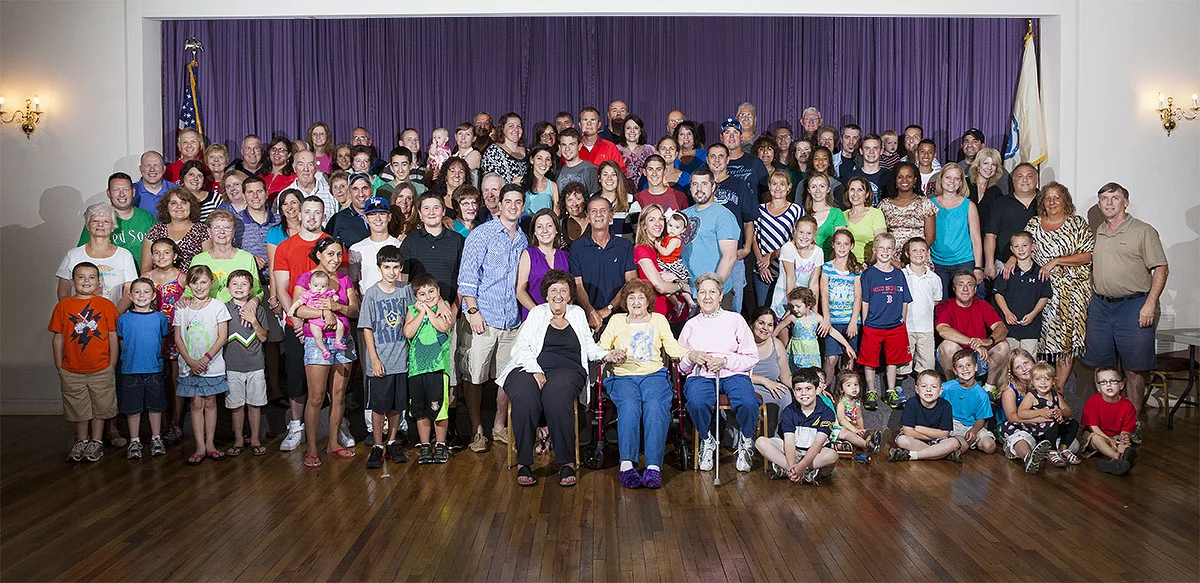
My family hadn't had a reunion in almost 15 years, until just this year. The reunions, as I remember, were always my dad's mother's side of the family. Her maiden name is Cicone, which is why we always called them Cicone Reunions. Makes sense, right? Anyways, this year my aunt took the reigns and decided to plan another reunion. Everyone was really excited about it and there was a great turnout. Me being a photographer, I brought my camera, a tripod, and several lights to try to and capture a big group photo. There were just over 100 people in attendance and I needed to be in the picture, too. Coordinating 100+ people and getting them all to cooperate was a nice challenge. With the help of my aunt on the bullhorn, she told everyone to come to the front for a group photo. That was the easy part. I wanted the elder Cicone family members seated front and center. As this day was really a celebration of them, I wanted them to be easily seen.
As everyone was piling on to the stage, I dialed in some settings on my camera. I knew I needed a small aperture so that everyone would be in focus and didn't want to go too high on my ISO to avoid any grain because I knew I would be cropping this image and enlarging it. Next came my flashes - three Canon 600EX-RTs (one on top of my camera with a bounce card for just a bit of fill light). They both needed to be at equal power to get even lighting across the board. 1/4 power seemed to do the trick. Fired a couple test shots as people were still getting situated. Image looked too dark - needed to boost my ISO a bit. Fired another test shot. Nailed it.
At this point, people had been setting themselves up on the stage for just over five minutes - which is just how long it took me to set up my flashes, dial in the correct power on those flashes, set my camera to the right settings, put my camera on the tripod, focus the camera, and compose the image. Everything looked great. Now for the 10 second self timer so I had a couple seconds to hop in the picture before my camera snapped an image.
I took only two pictures, one right after the other. This was so I had options for head swaps in case anyone was blinking or looking away, I could correct that later in Photoshop.
Here's the original image:

Not bad. The people on the edges are a little too dark and the photo is in desperate need of cropping. Easy fix:

Once I had my exposure and crop where I wanted them to be, I could start fine tuning the image. I couldn't stand being able to see the gaps in the curtain and the arch that the curtain formed near the top, where you can see an awful shadow and the ceiling. I also couldn't stand the table on the left side of the image, the wall fixtures on both sides, the stray fire extinguisher signs behind some heads, and stray wires. I also liked being able to see the proscenium arch in the original image (although it's not really an arch, just a straight piece of ceiling over the stage) Time to fix all of those things and move that proscenium arch down:

It's hard to tell the subtle difference at this size, but when it's printed out, the changes are very apparent. The image just looks cleaner. In all honesty, if you looked at the printed and framed image that I made for my grandma, you would never know I made any of these changes. And that's the point. Any image manipulation should be invisible to the viewer. Image manipulation should make the photo better but without showing itself. Obviously there are times when image manipulation is meant to be obvious, but when manipulating an image like this, it needs to be invisible.
Hover your mouse over the image below to see a before and after comparison:
